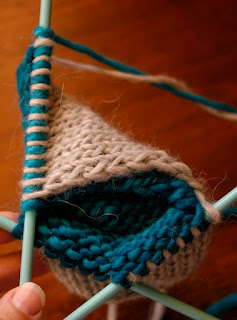
If you've knit your tube of a sock to the desired length you're now ready for the heel. We'll start with the heel-flap the above pic shows the finished heel-flap. Using Elizabeth Zimmerman's suggestion take half of your total stitch count and put them on one needle.
For the sample pictured here I have 24sts for each sock 48sts total, so 24 go onto one needle 12 of the gray & 12 of the blue with the other 2 needles holding the rest.
If you've never worked socks before when working the heel-flap you have to slip the 1st stitch of every row as well as working it back & forth in rows.
There really isn't a difference when slipping stitches than when working the K sts. Slip the 1st stitch for the outer sock, move the yarn to the front out of the way before slipping the stitch for the inner sock, knit to end.
And for the purl side, slip the 1st stitch for the inner sock, move the yarn for the outer sock to the front and
slip that too before working a purl row.
Sorry no videos for this post! I was on my own and taking pics one handed is a lot easier than trying to shoot video with commentary one handed! But working these rows is the same as working the stitches in the round as far as moving the working yarns so the socks don't join.
The heel-flap should start to look like this after a few rows.
And then a few more.
An easy way of knowing if the flap is long enough is to fold it over to see if it's as long as it is wide. When it is stop, you're ready to turn the heel which I'll post the beginning of next week.

These pics were sent to me by my friend Debra in Chicago. She scrapped the sock yarn and #2's for some Rowan Big Wool/larger needles and probably worked them up in a night! Looking good!

And finally for those of you who keep up with me here we had a sad day yesterday. We had to say goodbye to Ramsey our dog of 14 years, which is hard enough but when you're experiencing it through your child as well it makes it doubly so. He was a big part of our lives and we'll miss him! As my daughter said, "It's no fun saying goodbye to your dog." 


Sorry for your loss, but it's a beautiful photo of your daughter and Ramsey :)
ReplyDeleteI am definitely trying this out! Thanks for step by step images— you make it very clear. (And to you and your family, so sorry to hear about the passing of your beloved pet.)
ReplyDeleteI'm so, so, sorry for your loss.
ReplyDelete