Saturday, October 1, 2011

Vogue Knitting LIve


I have to say in hindsight I didn't do that great of a job documenting my 3 days at VK Live held here in Los Angeles last weekend. I guess I was having too much fun the first 2 days working in the BagSmith booth to go and check things out. By the third day when I did finally go around I was a little disappointed with the photos I was getting from my camera so I didn't go too crazy.

from L to R: jean, Shelly, me, Becca & Vicki
The best thing about the show was meeting & working with Becca, her mom Jean and her sister Shelly. Becca and I have been internet friends for awhile but this was the first time meeting in person and we all hit it off. Our mutual friend Vicki Stiefel joined us and was signing copies of her book, 10 Secrets of the LaidBack Knitters (a wonderful book for your knitting library but that's another post!).

Another great thing about the show was meeting Lisa who stopped me because she recognized the sweater I was wearing from following my blog! This was the first time that ever happened to me, so I of course was walking with a little extra spring in my step the rest of the day. Thanks Lisa!
with Lisa

I was planning on writing more about the show but I have so much knitting to catch up on I'll be brief.


RedFish Dye Works had a lovely booth with amazing colors! I don't even mind that this shot is blurry because the colors are so great... though I'm never going to a show again without my Nikon! 


I love this Namaste bag! Stylish & functional my favorite combination.

Jean refreshing my Tunisian crochet skills. 

Jean was probably the most photographed person at the show. You can't tell from the photo but Jean has a bit of purple in her bangs making her that much more adorable (and attractive to shutterbugs) and is just the sweetest person. For 3 days she showed countless people how to Tunisian crochet & to knit using the big needles and hooks that the BagSmith is known for.

At the end of the show Becca sent me home with a lot of yarn to work with. I really liked this yarn from Holland. It's a thick felted strand with a wire core. I made this bowl in a couple of hours. The red part is finger crocheted while the bottom is coiled and it's all joined with a mattress stitch.


Someone had other ideas for it!

Another yarn she sent home with me is called "Big Stitch Yarn Bumps". It's a alpaca/wool blend with a bit of nylon. All the animal fibers are from local Ohio breeders and I love it! 

 This is one big ball of yarn!
The girls had fun with it too! I'm working with a pair of #50's that Becca also sent home with me and it's working up just how I like it, fast! I'm still working on it though so back to work!

Oh one other thing that the BagSmith carries is a line called Sajou worth checking out for the packaging alone, beautiful!

Tuesday, September 20, 2011

the mini Magnum Capelet #1

When faced with having to get a last minute birthday gift for my daughters friend I decided to rework the Magnum Capelet #1 to fit the little ones.


I wasn't sure how much yarn I needed but knew I wouldn't need a full skein (123yds of Magnum by Cascade). Since I have a lot of partial skeins of Magnum I thought I would cast on and see what happened... it helps the capelet is worked top down.  I'm not sure how much yarn in the above color combo I used but it felt like it was just over half a skein.


My daughter really liked the capelet and with her birthday only a couple of days later I wanted to make her one too. I just happened to have a full skein of Magnum in purple (her favorite color) so it  gave me a chance to better gauge the amount of yarn I would use.


I had less than half a skein left when I finished. I was really hoping I would be able to get 2 out of the one skein knowing her sister would want one but after seeing it on her I didn't like the way it looked.

It was a bit big. 
I cast on with the remaining purple Magnum to see if I could squeeze another one out of it...

and was happy to find that with the remaining yarn I got yet a smaller version that is more proportionate for a 2 1/2 year old.

Available as a PDF download. $6.50

Finally, Happy Birthday to my big girl!


Thursday, September 1, 2011

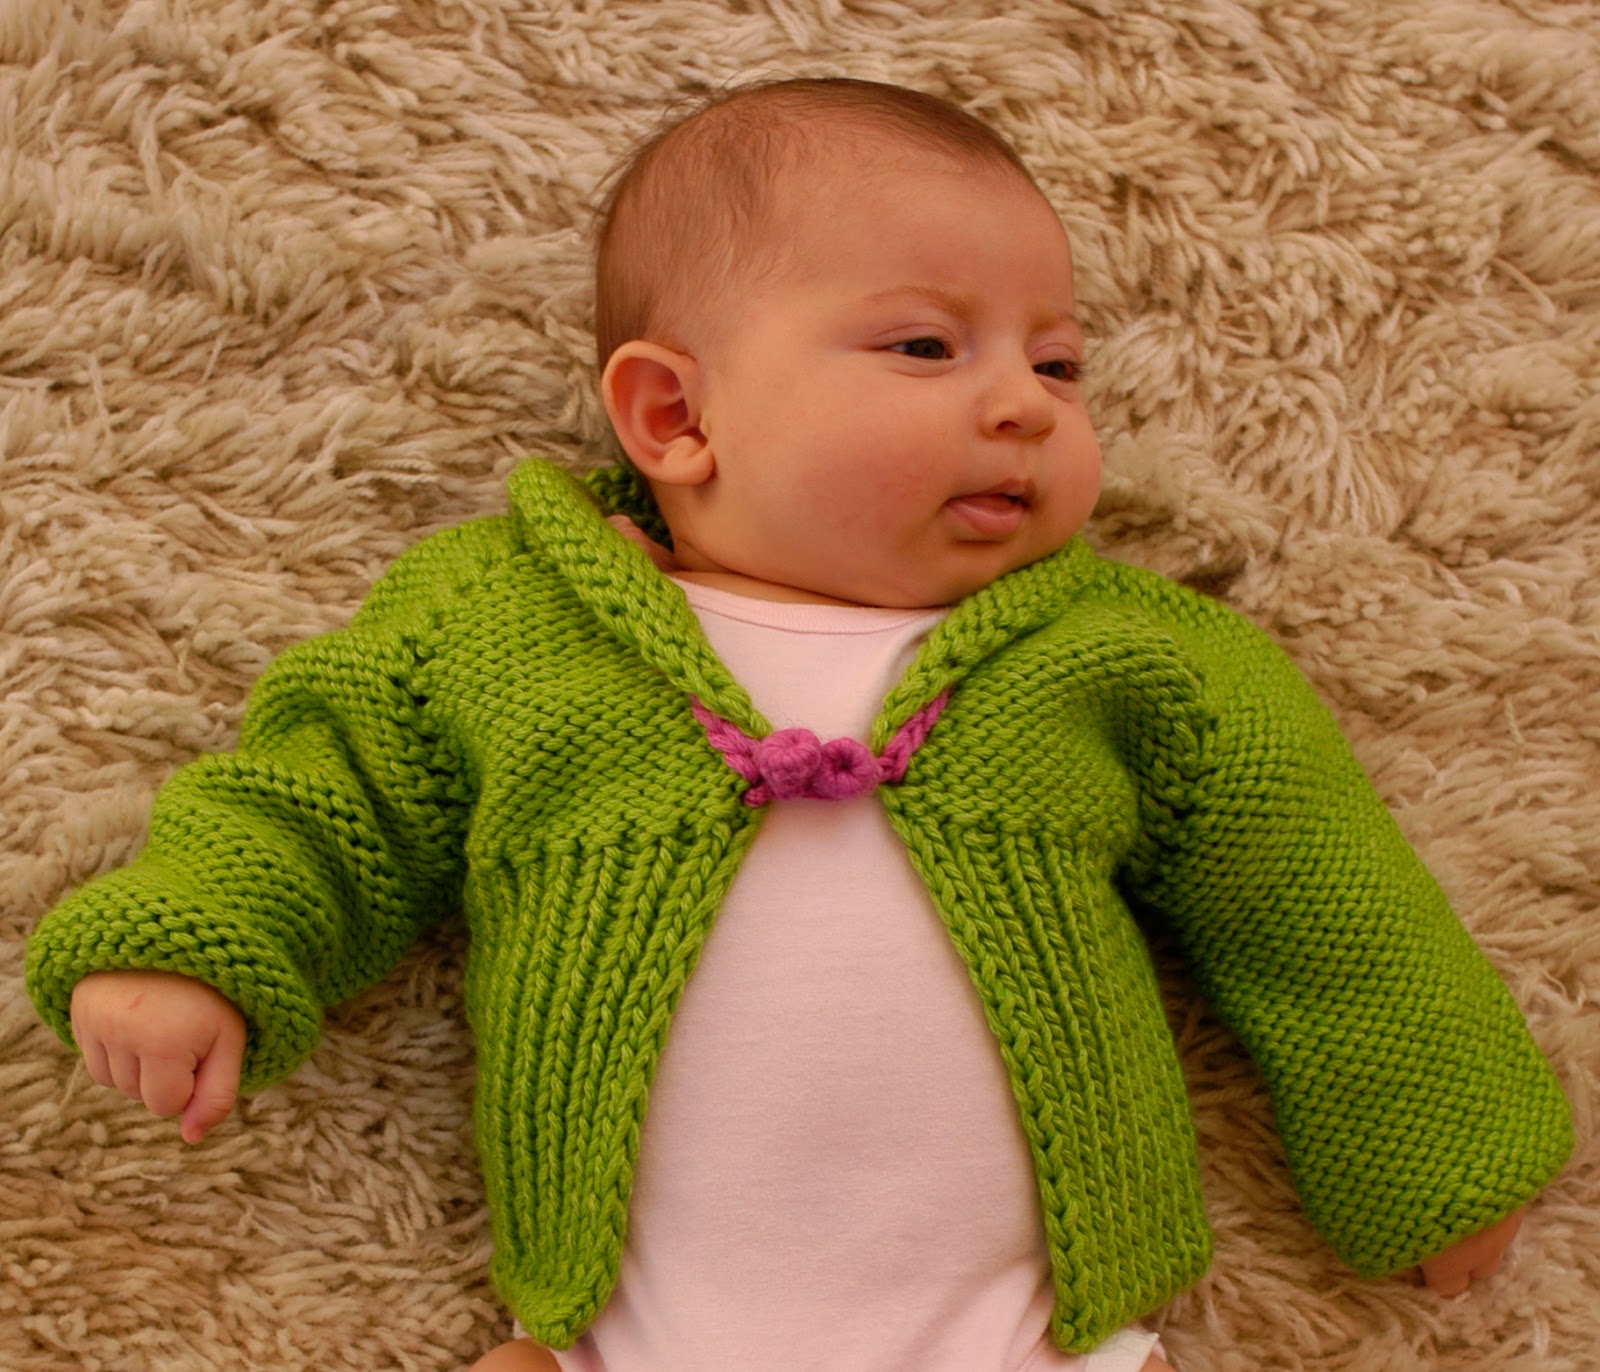
the end of summer baby jacket


 Sweet little baby Jesse, 10 weeks old.
I purposefully disconnected this summer to connect more with my family and like that the summer has flown by! And what a great summer we had, but wow! 3 months since my last post?! Although I've been disconnected in the technological sense I haven't been disconnected from knitting and here's my latest design... a stylish end of summer jacket for the little one.


Before I had kids I made the mistake of making a friends twins matching sweaters that were sized 3 months. I just wasn't thinking about how fast they grow! It was a lot of work for such limited use I learned my lesson with those, although their mom really cherished the sweaters and that made it worth it.

 
 someone didn't last long for this photo shoot!


So with a few late summer babies to knit for I wanted to make something that would get used a little longer. Designed with a growing baby in mind this long sleeve jacket for a newborn becomes a cropped 3/4 length sleeve jacket for a toddler.

Worked top down in a raglan style the upper body, sleeves and mini shawl collar are in reverse stockinette stitch while the lower body is worked in a 1x1 rib and finished with a kitchener bind off. One of the best things about it is it only uses @ 218yds (@199m) of a bulky weight yarn with #10.5 needles also used #10 for the ribbing & #8 for the kitchener bo. I used Cascade's Venezia Bulky but was sadly informed that this yarn, a wonderfully soft merino/silk combo is being discontinued. They do carry this in a worsted and a sport, which ironically I used for Wilhelmina's Baby Sweater the worsted same color too! Subconciously I must have something for this green.

The use of different increases & a kitchener bind off being the most difficult parts of this jacket would make me rate it for the intermediate knitter, but with the bulky yarn it's a quick knit... good thing too since my list of babies to knit for keeps growing!

 
I thought the handmade buttons helped complete the look. 

 
A simple slip stitch crochet button loop. 

 A crochet chain piping in a contrasting color around the neckline & under the collar gives a hint of color.

 
The kitchener bind off, a nice polished finish.


I think she's done.

Available as a PDF download $6.50

Thursday, June 2, 2011

the Sophisticate


Finally! The Trinity Collar Jacket, reworked, renamed and ready! I have to say I was happy to rework it to include variations: shorter collar/longer body; longer collar/shorter body; cap sleeve or 3/4 length, options I didn't have in the original version. Except the cap sleeve, when I had it on my dress form before I did the sleeves I really liked the look of it and was going to include that, easy enough with a top down construction!

 Shorter collar/longer body

Speaking of construction, this jacket is worked from the top down in Stockinette stitch with the collar worked separately in Trinity Stitch then attached by either a 3 needle bind off or grafting. It is buttoned at the top only with 2 crocheted buttons and is meant to be worn belted not bad looking without though.

The variations are all noted throughout the pattern and though the body is worked in Stockinette it is worn as Reverse Stockinette. The longer collar is adjustable by buttoning one side underneath the other to create a fuller look.

 
longer collar
The materials you'll need are #15 & 17 circular needles.
Blissa chunky alpaca (130yds) by the BagSmith. 5(5.5, 6) Skeins for the shorter collar/longer body.
5(5, 5.5) skeins for the longer collar/shorter body.
For cap sleeve/vest version subtract one skein.
I would rate this for an intermediate knitter.

Gauge: 2.25 Sts & 3 rows = 1” in Stockinette St;
2.5sts & 3 rows = 1” in Trinity Stitch
Fits chest measurements: S, 32-35”; M, 36-39”; L, 40-43”
The jacket pictured in all photos is a Large.


shorter body/longer collar

longer body/shorter collar

shorter body/longer collar

shorter body/longer collar adjusted

longer body/shorter collar

When I first made this jacket I so liked the shorter body with the longer collar I was definitely biased in how I looked at the 2nd version with the longer body/shorter collar. But the more I look at it I would be hard pressed to know which one I would make for myself! Unfortunately for me I had to send this off to the BagSmith but if you're going to TNNA next weekend head over to their booth where you'll be able to see it in person and feel it! You will fall in love with this yarn! 


Available as a PDF download. $6.50


Monday, May 30, 2011

and finally! 2 in 1 sock KAL part 5: the toe

Almost there! So 2" before the final length of your sock you'll start the decreases to shape the toe. Decreasing for the toe is treated the same as the decreases worked for the heel & the gusset in that you'll have to rearrange your stitches to work the SSK's and K2tog's.


Before decreasing make sure your needles are arranged as follows. The needles are usually numbered as #1 being half of the bottom of the foot sts, #2 being all of the top of the foot sts and #3 being the 2nd half of the bottom of the foot sts. So for my sample I had 12sts ea on needles 1&3 and 24 on #2.

K to 3sts before the end of #1 rearrange your sts K2tog for the outer and inner sock, K1 in the usual way. On needle 2, K1, rearrange the sts for a SSK, k to 3sts before the end of the needle, rearrange the sts for K2tog, K1. On needle 3, K1, rearrange for SSK and K to end.
Work an even round between decrease rounds and repeat decrease round even round until the toe is an adequate length to cover your toes. The first pair I made I decreased too many and didn't like the pointy toe look. This one I left more stitches and I think it looks better.

This is the bottom of the sock, but doesn't it look like a mitten? This technique works for mitts too.


Once the toe is shaped and you're ready to graft you'll again have to rearrange the stitches. Separating the stitches for the inner and outer socks to look like the photo below.

4 needles total.

Once the stitches are arranged this way you can then graft the toes together starting with the inner sock first.


Then the outer sock.


Now there's just one last thing to do besides weaving in ends....


Give a little tug and your 1 sock turns into 2... are immediately grabbed up and happily worn!


It feels good to at least be done with the sample as I still have a ways to go with the Misti sock, but I'm close!


I enjoyed this KAL and plan on doing another one soon I'm thinking a top down sweater with set in sleeves. Hope some of you were inspired to try it and found it easy to follow or maybe you just bookmarked it for a later date in any case I welcome photos anytime!