Monday, June 28, 2010

Magnum Capelet #4 (knit)


I wasn’t planning on designing another capelet but through etsy I was asked to design a knit version for the crochet Magnum Capelet #4. I love the way the crochet version looks so I wanted to try and mimic the crochet stitch I used and also make it reversible. I like the versatility of being able to wear each side as the right side and to wear it with the collar either up or down. I played around with varying stitches in basket weave thinking that best resembled the crochet capelet but decided instead to improvise more from the brioche stitch and came up with this reversible stitch pattern. Because of a couple techniques used I would rate this for at least an advanced beginner.

Yarn used:2 skeins of Cascade Magnum (246yds) 
 I used both skeins, you could use a little less but definitely not just one.
#19 circulars 24" in length.
Gauge: 1.5sts = 1"
Sizes: sm/md/lg

Available as a PDF download. $6.50


Thursday, June 10, 2010

my acrylic heirloom part 2


This is a sweater my mom knit for my dad in the 70's. I remember seeing it as a work in progress on the couch and thinking she'll never know if I knit a few stitches. This was before she taught me and I'm sure when she picked it up again it was a bit mangled. But I was confident I knew what I was doing just from watching her knit so often.

It's another sweater that I have a love/hate with; love it because she made it for dad but hate it because of the horrible yarn. The color is actually nice. It's green with specks of blue. Malabrigo has a color like this named Solis that I love perhaps because it reminds me of this sweater.

My parents were both born in the 1920's. I have to think their love affair with anything convenient stemmed from living through the depression. Acrylic was up there with frozen foods, they couldn't get enough of it. Imagine you could throw a sweater in a washing machine and not have it shrink. No moths to worry about and it was cheap! When my sisters and I would buy 100% wool my mom couldn't understand it. "You girls are so extravagant!" she would say. Or "do you really want something you have to hand wash?" while shaking her head. Although she could appreciate the finer fibers and wouldn't shy away from a cashmere twin set it was convenience that always won out.


 Here's my dad on their wedding day surrounded by some of the men from my moms family. It's one of my favorite family photos because it so aptly captures their sense of humor.

Wednesday, June 2, 2010

pattern possibilities

It's only recently that I started to write down any sort of directions for pieces that I've made. The whole time having the store friends and customers alike would ask me to write patterns for what I was making. Like a sullen kid who had to get homework done for Monday morning I fought it. I would tell them, "consider them giant swatches for you to see the yarn", so lame! And again like that sullen kid once I started doing it I discovered it wasn't so bad, in fact I really enjoy the challenge of trying to translate my chicken scratch notes into an actual pattern.

Now that I don't have the store and have more time to give to my knitting "career" (let's see 24hrs in a day, minus 13 hours of child chasing, minus an hour or so to catch up on the day with the hubby, oh and sleep minus 6-7 hours for that, ok so maybe 3 hours a night for knitting barring any interruptions from the geriatric dog or the should be sleeping children) I'm going through about 5 years of garments I've designed for store displays, photographing them and deciding which ones I want to revisit. Some of the pieces I don't have any notes on, others almost completed patterns but I'll post periodically as I sort through maybe seeing it "out there" will help me decide.


I was inspired to make this vest after seeing my oldest daughter wear one of her winter vests upside down. It created this wonderfully wide collar. I really wanted to put in a zipper to make the collar stand up showing it off better and I still might, but for the photograph I settled for using a single button. I don't have any notes on this vest although the construction was fairly easy. 2 skeins of Magnum & #19's It shouldn't be a hard pattern to write.


This is a pattern I'm currently working on. I'll have 2 versions. This one with the long sleeves and lots of collar; and a more scaled down version with 3/4 length sleeves and less of a collar. The one pictured here was made using a yarn called Fusion by Madil that has since been discontinued, so disappointing because it was the perfect mohair/merino/acrylic blend. Very lofty and soft. An aran weight yarn for a #9 needle although on this I used #11 & 13's. It created the perfect drape. I think I've found a good substitute though in Cascade's 100% wool Soft Spun. It lacks a bit of the fuzz the mohair provided but it has that loftiness making it a very lightweight sweater. The drape seems to be just as nice. Watch for this pattern soon.

I have the pattern for this it's just one of those pieces that I'm not 100% sure of. I made one that I did put a zipper in and I love it. It's more a cape than a jacket since the sleeves don't separate from the body near the armpit but right above the garter stitch border. I get many compliments on it, it's an easy knit and it looks good on a lot of body types. What's my problem?! If third time's a charm I think I need to make one more to be sure.

Thanks to the hubby for taking photos, to my friend Skye for stepping in for the photos and my dear Herman for letting me use his gorgeous yard for the location.

Monday, May 24, 2010

thoughts of mom & my acrylic heirloom

This is a cardigan my mom knit when she was pregnant with me. It's made out of bad 60's acrylic with ugly plastic buttons she replaced probably in the 80's; I seem to remember pretty glass buttons when I was very young. I always liked the gradient browns and the picot collar, I always hated the yarn but it's one of my most cherished possessions.

My mom was not a sentimental woman. She was not the type of woman who would gingerly wrap a beautiful woolen hand knit in lavender scented tissue paper placing it in a clear bag zipped up against moths saving it for one of her 6 daughters to wear when she turned 16 or some other milestone number. No mine was the type to pull out a refrigerator box full of clothes twice a year, spring & fall and make you try on anything in the box that might fit you for the next 6 months; and if there happened to be a sweater in there that she knit for herself when she was a young woman that by now could fit you as a 6 year old, well then darling there's your heirloom. By the time I got the sweater my mom is wearing in the picture of her with skis it was a stiff felted mass with no redeeming qualities except she knit it. I'm sure she tossed it away against our wishes saying as she would say to me now still holding onto this brown sweater, "What do you want with that old rag?! Get rid of it!" But it was hers, she knit it and I can feel closer to her while wearing it.

This picture is my mom in her wedding dress which I'm sure she made because if she could make it for cheaper than buying it she would. I always loved this dress and the fact that it was a pale blue worn with a vibrant red overcoat, but I included it because when I said unsentimental... a week after my mom's wedding she gave this fantastic dress to a church rummage sale! I remember asking her why and as usual, "why would you want that old thing?"

Tuesday, April 20, 2010

the Collar, a continuation on a theme

Sometimes it takes getting a baby back to bed at 3am for a girl to do her best thinking. I learned growing up in a house full of people that the best way to shut out noise is to start thinking about the things I'd like to do. As an adult that translates into a to do list so it was somewhere between 3 or 4am that I realized I didn't post the pattern for the Collar. Here goes:


Materials:
Yarn, you're probably thinking, "let me guess!" and you would be right.... Cascade's Magnum (less than one skein; color 9431 was used here). I do use other yarns, I'm just in love with this one! 
#15 circulars at least 32"
a crochet hook & darning needle for finishing 
1 large button
Gauge: 2sts & 2.75 rows = 1"
This was knit with an adult in mind. As you can see it's a little large on my model here. The neck opening measures @17" from end to end (not including the buttonhole loop). Consider this the frame work for any sort of modifications like casting on fewer stitches for a smaller size; casting on the same amount but with more decreases again for a smaller size; using a lace pattern; adding short rows to create fullness in the back etc.


Cast on 270 sts and work in Stockinette St for 8 rows.
Row 9: k7, k4tog, k1, *k5tog, k1* end with k4tog
Row 10: purl
Row 11: k 6, *k2tog*
Row 12: bind off using the purl st to last 5 sts. Cut yarn leaving a long enough tail to feed through the last 5sts. With a darning needle come back between 2nd & 3rd st (back to front) and with a crochet hook, chain enough sts to form a button hole loop. Slip stitch the loop together. Weave in ends and enjoy!


And if you get a chance, check out this video on hyperbolic crochet.... to continue the theme.

Monday, April 19, 2010

creative mathematics


If hyperbolic geometry was as easy to understand as hyperbolic crochet is as easy to do I wouldn’t have failed math. I enjoyed arithmetic as a kid. I got that, the theories were easy to understand 2+2=4. The higher maths I never enjoyed. What I did enjoy was a workshop last weekend on hyperbolic crochet hosted by The Little Knittery in my neighborhood, Atwater Village.

Taught by David Orozco (of That Yarn Store fame) in a way that made me think I could understand it, in fact made me want to understand it. Though I have to admit once I started to crochet I lost myself to the meditative nature of repetitive actions; thoughts of how to incorporate these forms into my current designs and of a past design… the very first piece for the Knit 1 store window. For the display I placed this simple collar on a vintage dress form, that was it. I was surprised at how many people responded to it, it seemed almost too simple of a thing to me. But I'm sure what captured their attention was the natural sculptural quality of the hyperbolic form.

They're simple to create and beautiful to see... what can you do with them? For a vivid peek at the potential of hyperbolic crochet: http://crochetcoralreef.org/

If you're looking for a more dry " it is impossible to isometrically embed the hyperbolic plane as a closed subset of the Euclidean 3-space" exploration look to Cornell University

Thanks to TStone of Sknitter to turning me on to this workshop. Go to her listing where you'll find these and other links to hyperbolic creativity.


My sample from the workshop.


David showing one of his many samples. The section he's holding between his fingers took him at least a movies length to complete!

Friday, April 9, 2010

it's still a simple shrug

Well after a couple of crazed months we've landed in Los Angeles and while I would love to have something new to share with you from my new locale (virtual & real) I'm afraid it's still a simple shrug.

Meanwhile back in Chicago Knit 1 lives on! My dear friend and unofficial partner of 4 years Lynn Coe has taken the reins and is currently revamping to really take the store to the next level. Knit 1 Chicago Keep on supporting a great local small business!
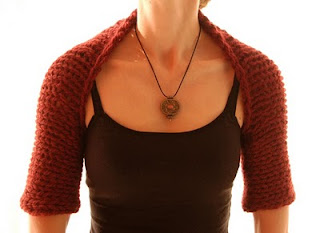


This was a shrug I did for the store window a couple years back. I had forgotten about it but was going through things to pack up and thought I would resurrect it.

It's a simple shrug with a couple more advanced techniques thrown in to make it challenging. A provisional or invisible cast on is used to create seamless sleeves by grafting (kitchener) the 1st & last row together; while short rows are used to create a slight shawl collar.

Hope you all enjoy!

A Simple Shrug

2 skeins Misti Alpaca Super Chunky or @100-120yds of the equivalent yarn
#19 (24" or 29") needles
darning needle for finishing
stitch markers
gauge: @1.5sts = 1" in stockinette stitch
note: always slip the 1st stitch of each row purlwise
Size: one size; the finished width 36" slightly stretched, if you want longer sleeves cast on extra stitches. This piece is worked until it can circle your upper arms.

Using a provisional cast on, cast on 48sts (Theresa Vinson Stenersen has a good tutorial on knitty.com provisional/invisible cast on ) 

Knit 1 row marking 11 sts on each side for the sleeves (k11, pm, k26, pm, k11).

Begin short rows: short rows assistance if you need it.

Purl 24, pm (to mark the center; I find this helpful to have a visual to divide the work as I'm making short rows.), p2, wrap & turn (from now on referred to as w/t).
K4, w/t
P4, pu wrap & ptog with stitch it's wrapped around, p2, w/t
K7, pu wrap ktog, k2, w/t
P10, pu wrap ptog, p2, w/t
K13, pu wrap ktog, k2, w/t
P16, pu wrap ptog, p3, w/t
K20, pu wrap ktog, k3, w/t
P24, pu wrap ptog, p to end
K36, pu wrap ktog, k11

Work in stockinette stitch for as many rows needed to circle your upper arms. Graft/kitchener (again Theresa has a great tutorial on grafting) as many stitches needed to have the sleeves reach your armpits; 11 is average @ 8.5". Starting at the outer sleeve edge work towards the center. Bind off loosely or Julie from knittedbliss turned me onto this great video tutorial with Cat Bordhi for a springy bind off.