Thursday, December 30, 2010

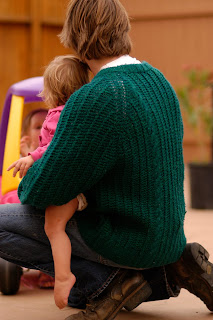
the Bubble Sleeve Jacket

This is another piece I designed for the store window a couple of years back. The original is a little shorter/boxier with a zipper closure made in black yarn. I wanted to post pictures of it but if you've ever tried to photograph a black sweater it's useless. The shape comes through but the details are lost.
I posted about this design in June and was ready with the pattern in November but between the crazy weather and the holidays I was beginning to think it wasn't going to happen.


This jacket is worked from the top down in a raglan style using stockinette stitch with garter stitch finishing on the collar, facings & cuffs. The use of different increases being the most difficult part of this jacket would make me rate it fairly easy, a great 1st sweater for a beginner looking to challenge themselves. It's really more a cape than a jacket since the sleeves don't separate from the body until the garter stitch border though the way the sleeves are shaped and the way they hang can give the illusion of being separate. I enjoyed making the buttons for "a Smart Cardigan" so much I wanted to try it with bulky yarn and I like the result.

Techniques used: lifted bar increases M1L & M1R. Cast on can be a long tail or any simple cast on and picking up stitches. I did do a springy bind off on the collar resulting in a wider round collar when compared to the collar I made on this one which was just a traditional bind off. Besides that it's just knitting and purling.

Knit on a #17 (or #19 to get gauge) with a gauge of 1.75sts & 3 rows per inch and using 3.5 (4) skeins of Cascades Magnum (123yds) this is one you could work up over the weekend.
Sizes: S/M 30-34" bust; L 36-40" bust. 
This jacket is very generous in size.

I love wearing this jacket! I like that when I'm wearing it I feel I'm dressing up my uniform of jeans and a T shirt. The drape and the softness of the yarn, it just feels good!

Available as a PDF download. $6.50


Tuesday, December 7, 2010

the Misti Net Scarf

I have another jacket pattern coming soon but in the meantime thought I would clean house and make this pattern a free one.


This is a great scarf for beginners wanting to challenge themselves with having to count within a pattern. Knit lengthwise to give a different perspective to a simple open work pattern. 

Update: For the updated photos of the scarf with the gray yarn I used 1 skein of Magnum Super Chunky by Cascade (123yds) and a #19 needle. I would use at least a 29" long circular needle since the scarf is worked lengthwise.
For the cream color scarf I used 3 skeins of Misti Alpaca Super Chunky (55yds per skein; @150-165yds total) on #17's (again I would use at least a 29" long circular since the scarf is worked lengthwise).
I didn't measure for gauge, but keep it loose. If you knit tightly definitely go up a needle size or even two. The more open the better and don't worry even with the open pattern the thickness of the yarn makes for one very toasty scarf.

OK so how simple is this: 
 Note: These scarves are worked lengthwise.

Cast on 100 stitches
Row 1: Sl1(purlwise) * yo, K2tog * K1
Repeat this row 10 times. Bind off.

Cut fringe and place on ends of scarf; wear & be warm!


This free pattern is here.

Sunday, December 5, 2010

the October Vest

  
  The October Vest? Does it sound too much like Oktoberfest? and in December? That's when I was supposed to have it done so I thought it appropriate but I don't know... I could see myself wearing this in Germany, I'm not much for drunk crowds so I don't think I'd hit Munich for Oktoberfest but I've heard Berlin is an amazing city right now and would love to go.
Back to the real reason you're here... this vest was inspired by my daughter when I saw her put on one of her vests upside down. The bottom of the vest created this wonderfully large wide collar that I wanted to recreate. I didn't intend to have it reverse stockinette stitch but after completing it I liked it better inside out, so the right side became the wrong side and has a lot more visual interest for me. This could be a reversible piece if you wove your ends in perfectly, mine is not. 


Yarn used: Cascade's Magnum. 2 skeins for the S/M & 3 for the Large.
This pattern is written with one set of numbers, the difference for the sizes is the gauge. 
Gauge: for S/M 2 Sts & 3.25 rows = 1”; for L 1.75 Sts & 2.5 rows in Stockinette Stitch
S/M = 30-34” bust; L 35- 40” bust.
I used a #17 to obtain both gauges for the different sizes but a #15 or a #19 might be used too.

Techniques used: invisible (provisional) cast on, short row shaping and picking up stitches.
I would rate this for at least the advanced beginner.  
This would be a good project to learn short rows with since there are only a couple of turns.

Available as a PDF download. $6.50

Sunday, November 28, 2010

a Smart Cardigan


This is the 3rd pattern in my latest series that requires a little participation on your part to make it a custom fit and another one designed for Lynn at Knit 1 in Chicago. Knit from the top down in a raglan style I used a 1x1 rib for the body and a woven basket stitch for the sleeves to give this piece just enough interest to keep a simple shape from being boring.

The final look of this sweater isn't what I originally thought I would make but it's one I'm very smitten with. From the finished look of a kitchener bind off, to a slight cap shaped sleeve, to the buttons made by crocheting around a small ring the detailed touches are what make this sweater smart indeed.

Knit using Lorna's Laces organic merino Green Line DK (145yds; color: Chagrin) and a #8; gauge 8sts in both 1x1 rib (not pulled) & woven basket stitch and 5 rows to the inch.


Techniques used: Kitchener bind off, picking up stitches, the increases KFB (knit into the front & back), M1 (make 1) the lifted bar increase both left & right leaning, left & right leaning decreases SSK & K2tog. I created an increase & decrease to maintain a consistent side seam which is fully explained in the pattern.

This is pattern is for the intermediate level knitter.


Available as a PDF download. $6.50


Friday, October 29, 2010

the Cowl Collar sweater


Pattern #2: the Cowl Collar sweater

This is another sweater I made for the store window but never wrote the pattern. Amazing the incentive a couple of compliments can be!

The fuller or more lavish cowl collar is the one I made originally but while writing the pattern I wanted to add a more moderate collar modification for a scaled down version.

This sweater is also worked from side to side (cuff to cuff) and of course top down. Again it looks like a pretty simple sweater but the techniques give it a challenge.


The lavish version was knit using Madil Fusion which has been discontinued unfortunately because this was a great yarn. A mohair, merino & acrylic blend that has a wonderful drape, is lofty and soft, very lightweight. Of all their yarns this one was the last that should have been discontinued! If you see it out there somewhere grab it up you won't be disappointed.


The moderate version uses Cascade's Soft Spun which is pretty close to Fusion in loftiness and weight it's just missing that mohair fuzz.


If you are trying to substitute the yarn go for something that isn't wound tightly it needs to be light. When you hold these finished sweaters in your hands they weigh next to nothing.


Even though both Fusion & Soft Spun are worsted I liked how it looked using #11 (body) & #13 (collar & bottom of main body) needles with a gauge of just under 2.5 Sts = 1” in Stockinette Stitch on #11’s; 2-2.25sts = 1” in St st on #13’s.

And like the Boat Neck this pattern is not for the pedestrian knitter. Sizes are easy to adjust as you work and will be noted. The numbers provided form the framework and a starting point while making modifications to those numbers for a more custom fit for any size. This is the easier of the last 2 patterns I've posted and maybe a better introduction to this type of top down construction although I would still rate this for the intermediate knitter because of the techniques involved.

I love both of these sweaters. It's interesting though how different you feel wearing one or the other. The moderate version you feel you could definitely wear it to the office then throw on a pair of jeans for a casual after work get-together with your girlfriends. Where as the lavish version feels like something you want to wear to feel special or maybe for someone special I don't know but there's something about the way it feels when you wear it, the lightness and the fullness that makes you feel sexy!


Available as a PDF download. $6.50

Thursday, October 28, 2010

the Boat Neck

What do they say about life getting in the way... as much as I try to get these out in a timely manner I'm always behind!

The next 3 patterns I post are not for the pedestrian knitter as your participation is needed in making it a perfect fit for your size. Although the pieces themselves may look simple enough the techniques used are more for an intermediate knitter. The sizes are easy to adjust as you work and will be noted in the pattern using the numbers provided as a guide.

As usual these are worked top down and the beauty of that for me is being able to try on the piece as you work to make the modifications needed resulting in a perfectly fitting sweater. Size modifications will be noted where needed throughout the patterns and if you get stuck email me I enjoy helping others understand top down construction.


Pattern #1: the Boat Neck


I fell in love with "the Boat Neck". I think of Jean Seberg or Audrey Hepburn in their casual late 50's attire and it's a shape I could wear everyday. I know in a previous post I said I was adding neck and cuff variations but I spoke too soon. After living with the sweater for a while I didn't want to take away from it's simplicity.

Sizes: S (30-32” bust), M (32-34), L (36-38) larger sizes are easy to adjust to using the modifications noted in the pattern. Knit on #9's using 3 (4,5) skeins of Aslan Trends Invernal (color #22/295yds); a rabbit angora, merino & polyamide blend that was so wonderful to work with I can't wait to use it again. 

Available as a PDF download. $6.50

Friday, October 8, 2010

the Babydoll


The yarn used for the Babydoll is one I wouldn't have chosen myself, Lynn at Knit 1 in Chicago sent it to me and while I was a little stuck at first with what to do I ended up really loving it. This is a yarn that could easily look wooly mammoth if you're not careful but in keeping the stitches loose so you can see the little tufts there's an airiness that keeps it looking & feeling light.

Worked from the top down, the size is generous to fit most (laid flat and measuring the front at the underarm @26” across; measured at the bottom @30” across) with adjustments for petit or extra large sizes noted.

Knit using 3.5 Skeins of Schulana Rodeo (a kid mohair, merino, polymide blend) 383yds and a #19 24" circular with a gauge of 1.5-2sts = 1” (because of the little tufts of wool w/in the yarn there’s a half inch variance in the gauge) it's a pretty quick knit. 

I would rate this pattern as easy since the techniques used are casting on w/ 2 needles, knitting in the round using circular needles and using M1 (make one) the lifted bar increase for the increases.

The things I ended up loving about this piece are: the neckline, wide and open; it's lightweight and it's versatile worn belted or loose, with leggings or jeans; maybe a long sleeve shirt or just a cammy this is a piece you can throw on and go.

Available as PDF download. $6.50

Tuesday, October 5, 2010

rain, rain go away...


Rain in Los Angeles?! I normally love rain especially here but it's been 2 days too many! I never thought rain would be the delay for photographing my new designs. Maybe a horrific accident involving a cup of coffee but rain? Well, so it goes. Hopefully just a few more days. I'm excited though, I think you're going to like them.

Wednesday, July 21, 2010

pattern preview


I'm currently working on a few fall designs for the lovely Lynn @ Knit 1 in Chicago and here's a glimpse of the first one.

I wanted to create a simple classic shape and I love a boat neck neckline. This piece is knit side to side (cuff to cuff) from the top down on #9's with Aslan Trends Invernal (color #22/295yds); a rabbit angora, merino & polyamide blend that is gorgeous! The pattern will consist of this sweater with 2 variations, the variations being a cuff & neck treatment in either crochet or knit for those looking for a little something extra. I'll post photos of the variations when completed. I love the way this sweater looks and feels. This will be hard to part with!


On to a totally different subject but it does have to do with patterns. Last week my friend Terry sent me a link to a thread on Ravelry all about the fine print at the bottom of patterns stating what you can/cannot do with the pattern. It was quite fortuitous that she did as I was contacted by someone today who was questioning exactly what the crux of the Ravelry discussion was and that is the fine print that reads "for home knitting use only and are not to be knit for resale".

When Terry brought this thread to my attention I started thinking about how I should change the fine print on my patterns to read, "OK to knit for resale". I'm flattered that someone who is trying to make a go of selling hand knits would think they could make some money using my designs and frankly if they did it without asking what could I do? If I found out someone in Russia was making & reselling my designs at a craft fair or out of their home would I really go to the trouble of legally trying to stop them? Now if they were mass producing them it might be a little annoying and if they were Michael Kors I would want a job!

For me it's all about giving credit where credit is due. For anyone who has asked if they could sell items knit from my patterns I ask they give me credit as the designer and send photos because I like to see the finished piece; and for those of you who have purchased  my patterns and are questioning if you can make it to sell please do just don't forget the courtesy of crediting me. And please email me if you do, I like to know where I can see your goods.

Friday, July 2, 2010

the Collar (crochet)


Another request via etsy today, this time for a crochet version of the Collar. This is a super simple crochet project, perfect for teaching a newbie increasing and with a fat hook & chunky yarn it works up super fast!

Materials:
Yarn:
I used leftover Magnum from my stash, probably 1 skein worth (123yds) 200yds at the most. 
Hooks:
A size J for the buttonhole & finishing. For the collar itself the hook I used wasn't sized. Measuring it the shaft is 2” around. If 1” = 25.4mm that’s a big hook! Lion Brand makes an S hook and this site: Jenkins Woodworking makes U & V hooks or use whatever size will give you 1.25sts = 1"
Stitch:
Double Crochet

Unlike the knit version that casts on the outer edge and works in towards the neck; the crochet version starts with the buttonhole/neck edge and works out.
 The finished neck measurement not including the button loop is 16".

Pattern:
Using a size J hook chain 8 or 9 (depending on the button size) and join with a slip stitch. This is the button hole. Change to the larger hook and chain 28 (@ 17" slightly pulled). Chain more if you need a larger neck opening. I found the finished neck size is an inch shorter than the measurement of the starting chain. Starting in the 3rd ch from the hook work 3 DC's into each stitch 10 times; then work 4 DC into each stitch 5 times; work 3 DC's into each stitch to end (10x's). 

Note: for a more ruffled look work 4 or 5 DC's into each stitch. 

Ch 2 and turn; DC across working 2 DC's into the first & last stitches. Repeat this row once more. Collar should measure @5"; for a wider collar repeat last row until desired width.Weave in ends, attach a button and enjoy!


This collar, like the knit version was created with adults in mind. It's a little big on my model here so if you're making it for a child make adjustments according to their neck size.


Monday, June 28, 2010

Magnum Capelet #4 (knit)


I wasn’t planning on designing another capelet but through etsy I was asked to design a knit version for the crochet Magnum Capelet #4. I love the way the crochet version looks so I wanted to try and mimic the crochet stitch I used and also make it reversible. I like the versatility of being able to wear each side as the right side and to wear it with the collar either up or down. I played around with varying stitches in basket weave thinking that best resembled the crochet capelet but decided instead to improvise more from the brioche stitch and came up with this reversible stitch pattern. Because of a couple techniques used I would rate this for at least an advanced beginner.

Yarn used:2 skeins of Cascade Magnum (246yds) 
 I used both skeins, you could use a little less but definitely not just one.
#19 circulars 24" in length.
Gauge: 1.5sts = 1"
Sizes: sm/md/lg

Available as a PDF download. $6.50


Thursday, June 10, 2010

my acrylic heirloom part 2


This is a sweater my mom knit for my dad in the 70's. I remember seeing it as a work in progress on the couch and thinking she'll never know if I knit a few stitches. This was before she taught me and I'm sure when she picked it up again it was a bit mangled. But I was confident I knew what I was doing just from watching her knit so often.

It's another sweater that I have a love/hate with; love it because she made it for dad but hate it because of the horrible yarn. The color is actually nice. It's green with specks of blue. Malabrigo has a color like this named Solis that I love perhaps because it reminds me of this sweater.

My parents were both born in the 1920's. I have to think their love affair with anything convenient stemmed from living through the depression. Acrylic was up there with frozen foods, they couldn't get enough of it. Imagine you could throw a sweater in a washing machine and not have it shrink. No moths to worry about and it was cheap! When my sisters and I would buy 100% wool my mom couldn't understand it. "You girls are so extravagant!" she would say. Or "do you really want something you have to hand wash?" while shaking her head. Although she could appreciate the finer fibers and wouldn't shy away from a cashmere twin set it was convenience that always won out.


 Here's my dad on their wedding day surrounded by some of the men from my moms family. It's one of my favorite family photos because it so aptly captures their sense of humor.