Monday, May 30, 2011

and finally! 2 in 1 sock KAL part 5: the toe

Almost there! So 2" before the final length of your sock you'll start the decreases to shape the toe. Decreasing for the toe is treated the same as the decreases worked for the heel & the gusset in that you'll have to rearrange your stitches to work the SSK's and K2tog's.


Before decreasing make sure your needles are arranged as follows. The needles are usually numbered as #1 being half of the bottom of the foot sts, #2 being all of the top of the foot sts and #3 being the 2nd half of the bottom of the foot sts. So for my sample I had 12sts ea on needles 1&3 and 24 on #2.

K to 3sts before the end of #1 rearrange your sts K2tog for the outer and inner sock, K1 in the usual way. On needle 2, K1, rearrange the sts for a SSK, k to 3sts before the end of the needle, rearrange the sts for K2tog, K1. On needle 3, K1, rearrange for SSK and K to end.
Work an even round between decrease rounds and repeat decrease round even round until the toe is an adequate length to cover your toes. The first pair I made I decreased too many and didn't like the pointy toe look. This one I left more stitches and I think it looks better.

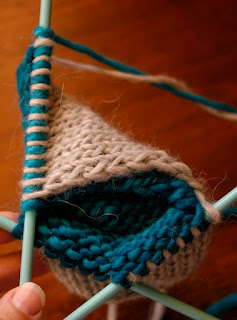
This is the bottom of the sock, but doesn't it look like a mitten? This technique works for mitts too.


Once the toe is shaped and you're ready to graft you'll again have to rearrange the stitches. Separating the stitches for the inner and outer socks to look like the photo below.

4 needles total.

Once the stitches are arranged this way you can then graft the toes together starting with the inner sock first.


Then the outer sock.


Now there's just one last thing to do besides weaving in ends....


Give a little tug and your 1 sock turns into 2... are immediately grabbed up and happily worn!


It feels good to at least be done with the sample as I still have a ways to go with the Misti sock, but I'm close!


I enjoyed this KAL and plan on doing another one soon I'm thinking a top down sweater with set in sleeves. Hope some of you were inspired to try it and found it easy to follow or maybe you just bookmarked it for a later date in any case I welcome photos anytime!

Thursday, May 19, 2011

2 in 1 sock KAL part 4: the heel part 3: gusset

Finished gusset.

When you finish turning the heel and end with a knit row your needles should be positioned to pu stitches along the heel-flap edge.


This you will do in a similar way to transferring stitches when you first cast on. Alternate picking up for the outer & inner sock.


When you get to the end, knit across the foot sts and pu in the same way along the 2nd heel-flap edge. End by knitting the 2nd half of the heel stitches.


If your needles aren't arranged how this above image shows rearrange your stitches now with Needle 1 having half of the heel stitches and 1 heel-flap edge (bottom needle in photo); Needle 2 the foot stitches (vertical needle); Needle 3 the other heel-flap stitches and the other half of the heel (top needle). After picking up the heel stitches knit 1 round knitting through the back of the heel flap stitches.

Notice how the stitches are twisted.

The next round will begin the decrease rounds that shape the sock. I like to decrease every round but you can decrease every 2nd or 3rd round to get back to the amount of stitches you started with. The decreases will always be at the end of Needle 1 and the beginning of Needle 3.

For Needle 1 knit to 3sts from the end, rearrange the stitches like you did for turning the heel, K2tog for both the outer & inner sock, K1 in the usual way. Knit across Needle 2.


For Needle 3, K1 in the usual way, then rearrange the stitches so you can SSK for both socks and K to the end.


Again continue working these decreases until you are back to the number you started with. For me with the sample shown 24sts each sock and for the Misti Sock 52sts each sock.


Once you've decreased to the proper amount of stitches knit to about 2" shy of the final length of your foot.

Next post we'll decrease for the toe. Almost there!

Friday, May 13, 2011

2 in 1 sock KAL part 4: the heel part 2

Hard to tell this heel has been turned!

 This photo showing the heel is from the 1st pair I knit. 

 Not quite there with the pair I'm currently knitting.

Now for turning the heel. I'm using the "conventional heel" that Elizabeth Zimmerman talks about in "Knitting Without Tears" for my socks. For the sample pictured here I'll work half of the heel flap (6 sts each for the inner & outer sock) then I'm going to SSK, K1 and turn which is impossible to do without connecting your socks so let's rearrange some stitches.


With a cable needle or an extra DPN slip the outer sock st and hold in front and slip the next inner sock stitch to the right hand needle.

Slip the next outer sock st to the extra DPN and put the inner sock st back onto the left hand needle.


Now either put the 2 outer sock sts back onto the left hand needle or work the stitches off of the extra DPN but work the SSK, K1 for each sock in the usual way; meaning work the outer sock first, move the working yarn to the front then work the inner sock.


Now turn the work so the Purl side is facing you.

P2 in the usual way, P2tog, P1, turn.


For P2tog we have to arrange the stitches again. This time the inner sock sts are slipped off onto a DPN. Then the outer sock sts are slipped onto the right hand needle, put the next inner sock st onto the DPN.


Take the outer sock sts from the right hand needle and put it back onto the left hand needle and again either put the inner sock sts back onto the right hand needle and work a P2tog or work a P2tog off of the extra DPN. P1 in the usual way, turn.

I'm thinking if you're trying this you've made socks before? If you have you've turned a heel or two and know to work back and forth in this manner until you've reached the heel-flap edges ending on a knit row. If you haven't, always decrease at the gap SSK on a K side & P2tog on a P side caused by the previous rows turn, then K or P 1 st before turning. Just remember to rearrange the stitches so 2 sts for the same sock are next to each other before trying to decrease.

I was going to go onto picking up stitches along the heel-flap but looking at this post I think there's enough information to absorb for now! Again, if there are any questions feel free to ask.

Next week shaping the gusset for the instep.

And thanks for the supportive comments & emails regarding our dog... very much appreciated!

Saturday, May 7, 2011

2 in 1 sock KAL part 4: the heel part 1


If you've knit your tube of a sock to the desired length you're now ready for the heel. We'll start with the heel-flap the above pic shows the finished heel-flap. Using Elizabeth Zimmerman's suggestion take half of your total stitch count and put them on one needle.

For the sample pictured here I have 24sts for each sock 48sts total, so 24 go onto one needle 12 of the gray & 12 of the blue with the other 2 needles holding the rest.

If you've never worked socks before when working the heel-flap you have to slip the 1st stitch of every row as well as working it back & forth in rows.

There really isn't a difference when slipping stitches than when working the K sts. Slip the 1st stitch for the outer sock, move the yarn to the front out of the way before slipping the stitch for the inner sock, knit to end.


And for the purl side, slip the 1st stitch for the inner sock, move the yarn for the outer sock to the front and


slip that too before working a purl row.


Sorry no videos for this post! I was on my own and taking pics one handed is a lot easier than trying to shoot video with commentary one handed! But working these rows is the same as working the stitches in the round as far as moving the working yarns so the socks don't join.


The heel-flap should start to look like this after a few rows.

And then a few more.


An easy way of knowing if the flap is long enough is to fold it over to see if it's as long as it is wide. When it is stop, you're ready to turn the heel which I'll post the beginning of next week.


These pics were sent to me by my friend Debra in Chicago. She scrapped the sock yarn and #2's for some Rowan Big Wool/larger needles and probably worked them up in a night! Looking good!


And finally for those of you who keep up with me here we had a sad day yesterday. We had to say goodbye to Ramsey our dog of 14 years, which is hard enough but when you're experiencing it through your child as well it makes it doubly so. He was a big part of our lives and we'll miss him! As my daughter said, "It's no fun saying goodbye to your dog."